|
EXACT DISPATCH (Including Tremcards in ALCHEMIST) |
|
|
SUMMARY A new module “EXACT DISPATCH” will enable you to allocate customer invoices by geographical area (or other parameters) to your delivery vehicles so that your delivery efficiency is maximised and vehicles are not overloaded. A series of reports are available to assist in loading and security checks (Loading sheet), delivery details (Drivers trip sheet), delivery sequence and money collection (Drivers log) and safety (Tremcard report). Examples of these reports may be seen at the end of this letter. If you are an ALCHEMIST user, EXACT TREMCARDS can produce a “Tremcard” report that will enable your drivers, with minimal training and difficulty, to be able to comply with the new Transport of Hazardous Materials Act. |
||
EXACT DISPATCH is set up like this: Firstly
you need to set up the various parameters in the affected modules
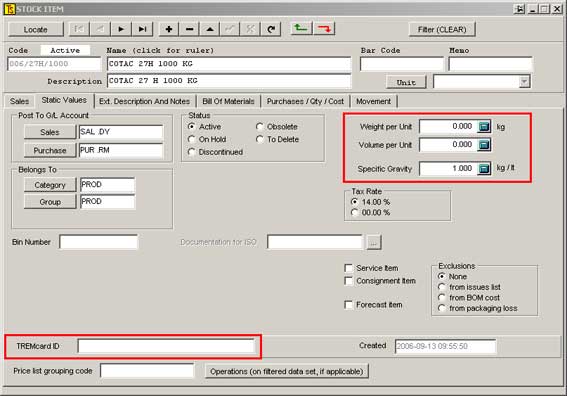
so that the system has all of the information needed. 1] The weight and volume of each item that you sell. (If the weight of your deliveries always reaches maximum load capacity of the vehicles before the maximum volume is reached, then you can leave out the volume) 2] ALCHEMIST ONLY – the Tremcard ID number or code for any products shipped that require Tremcard documentation. 3] The geographical area grouping of the customers that you deliver to. 4] Details of your delivery vehicles – Load Capacity in kilograms. Once you have all of the above information and have installed EXACT DISPATCH, you should do the following: In [Stock] [Maintenance] [Stock Items] [Items] select the <Static Values> tag You
will see a screen like this, except your screen will not have the
red rectangles that I have drawn around the two areas that need attention
before the Dispatch / Tremcard facilities will function properly. In the upper right red rectangle you will see that there is provision for you to enter the weight and volume of the item selected. If you are using ALCHEMIST correctly (i.e. using the specific gravity calculation facility), you will also see that we have included the SG of the formulation here to help you calculate the weight of the product if it is packed by volume. We have also provided you with little calculators that you can access by clicking on the icon at the end of the field. In the <Weight per Unit> field, once you have calculated the mass of the product by multiplying the SG by the volume of the product held in the container and adding the weight of the container, cap, and any additional items used to make the product, if you click the = sign in the calculator, the figure will be inserted into the field. The space that the product occupies should also be entered into the <Volume per Unit> field. When
your driver overturns the truck in his haste to make up lost time
caused by being stopped by a "Hazcop", the first arrivals
on the scene are going to need a Tremcard to tell them how to clean
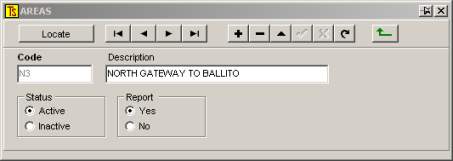
up the mess or stop themselves getting poisoned. Now you need to set up the areas in the customers’ records so that EXACT Dispatch “knows” where the customers are from a geographic point of view. Go to [Customer] [ Maintenance] and select [Areas] You
should see something like this: Build a list of all of the geographic areas where your trucks make deliveries. These areas can be based on any intelligent groupings, road routes , postal codes, etc., and may be used to sort your dispatches in an efficient manner. Now
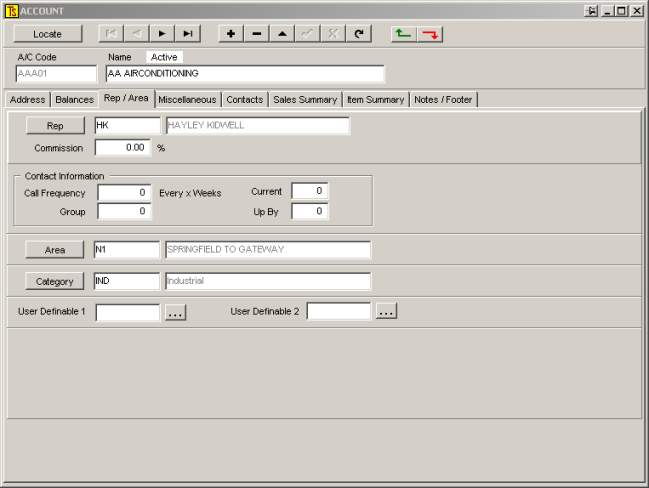
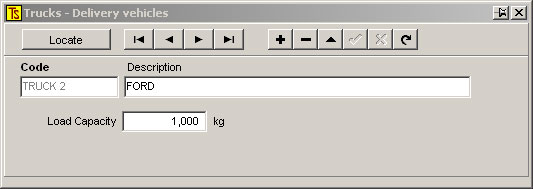
you need to allocate the areas to your customers, like this: Once you have laboriously entered all of this information there is still one more thing you will need to do to get the EXACT Dispatch to work: You now need to go to [Customers] [Periodic Processes] and select [Maintain Vehicles] You
will see something like this, but with blank fields. You will see that by clicking on the + sign you will be able to add in all of the vehicles that you use for dispatching your goods. You should also enter the maximum load capacity in the space provided. Now you are ready to operate EXACT Dispatch! Proceed to [Customer] [Periodic Processes] and click on [Loading Sheet] You
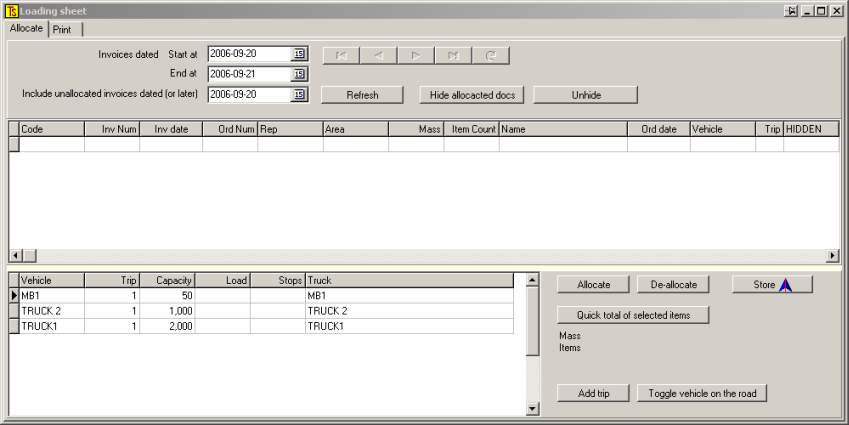
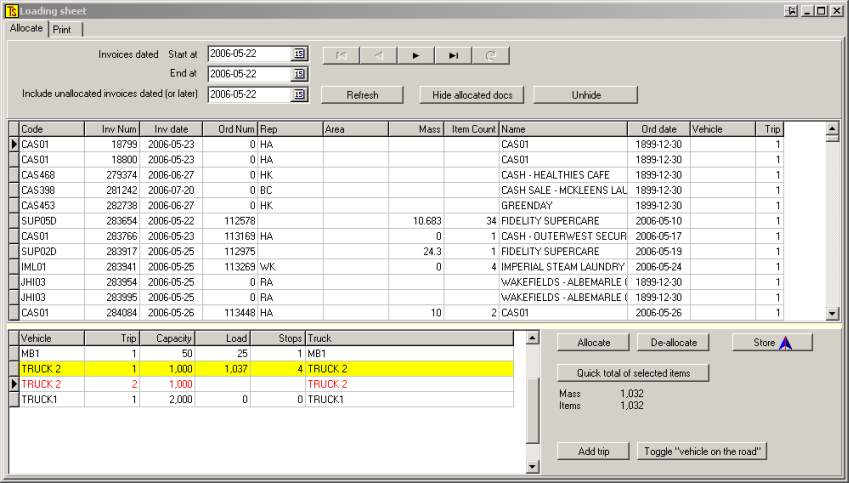
will get something like this: First you will need to select a date range that pertains to a range of delivery notes that have to be scheduled for delivery (The Start at and End at dates) You may also select a date for previous deliveries that have not yet been allocated to a delivery schedule. Now press the [Refresh] button. Have patience, the process of gathering the data can take several minutes. You
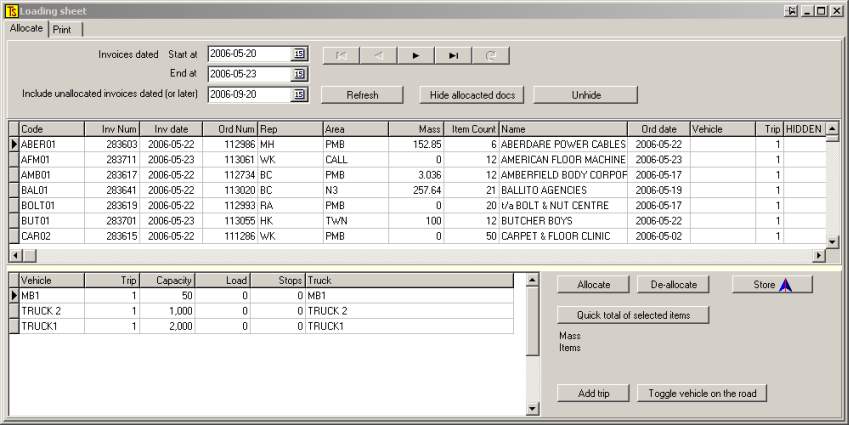
should get a screen something like this: If
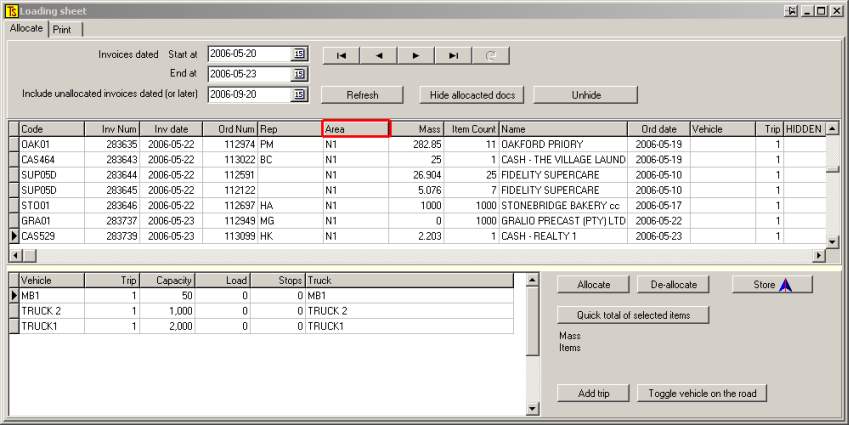
you now click in the grey area around the word “Area” at the top of
the column showing the areas where the customers are located (marked
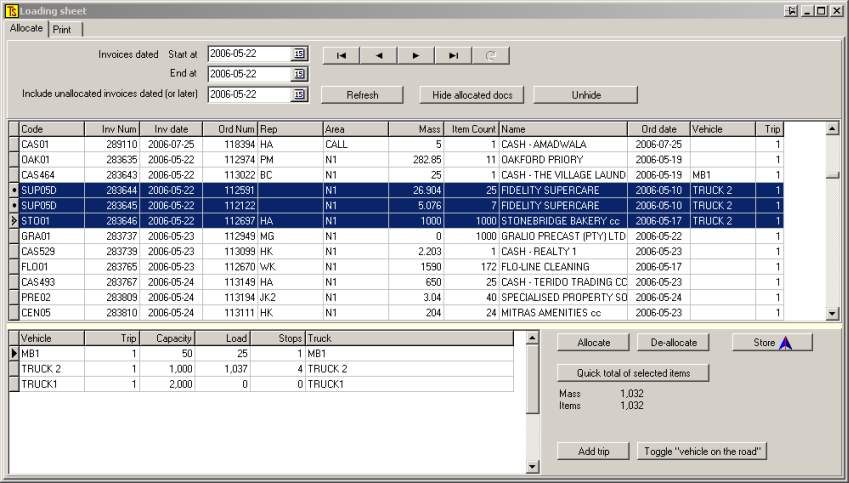
with a red square, below) You will see that the orders will be neatly sorted into the geographical areas where they should be delivered, thus: Now you may begin allocating the deliveries to the vehicles. You will see that the screen is divided into an upper ad a lower section. The upper section contains details of each delivery to be made (one per line), whilst the lower section contains the vehicles into which the deliveries are to be loaded. Firstly, select a vehicle to be loaded by clicking its row. A black triangle appears next on the left side of the selected row. Now move to the upper section and select some deliveries to go into the selected vehicle. To do this, hold the [Ctrl] button whilst clicking the rows representing the deliveries. You
will see that the weight of the individual deliveries is displayed
in the Mass column. Each row selected will be highlighted and if you want to see the total weights of the selected rows, click on the [Quick total of selected items] button. Once you have allocated invoices to fill the vehicle’s capacity, click on the [Store] button. You may make another trip for the vehicle by clicking [Add trip]. The next trip appears in red, as shown below. As you store the information the allocated deliveries will disappear so that you do not re-select them. When your allocations have been done you may select one or more vehicles and put them on the road by clicking [Toggle vehicle on road]. (The same button may be used to “Take the vehicle off the road”) (The bar turns yellow, as shown below)
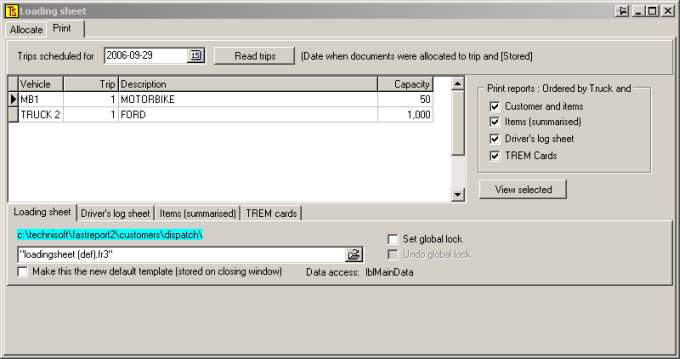
Now you may print the documentation to go with the delivery vehicle. At
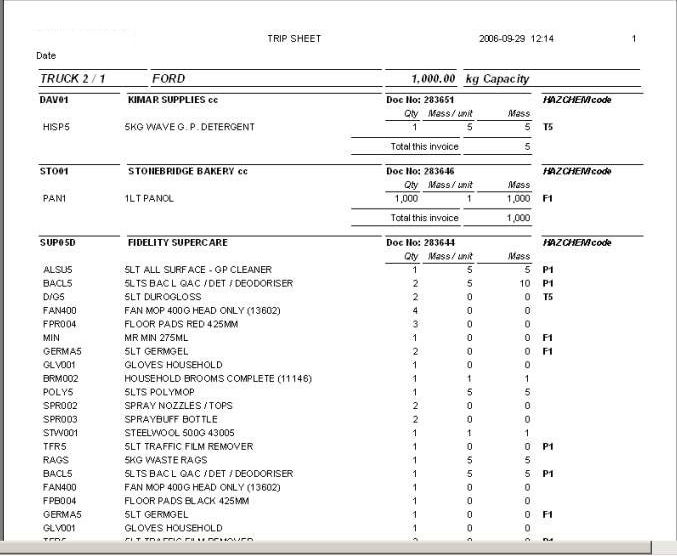
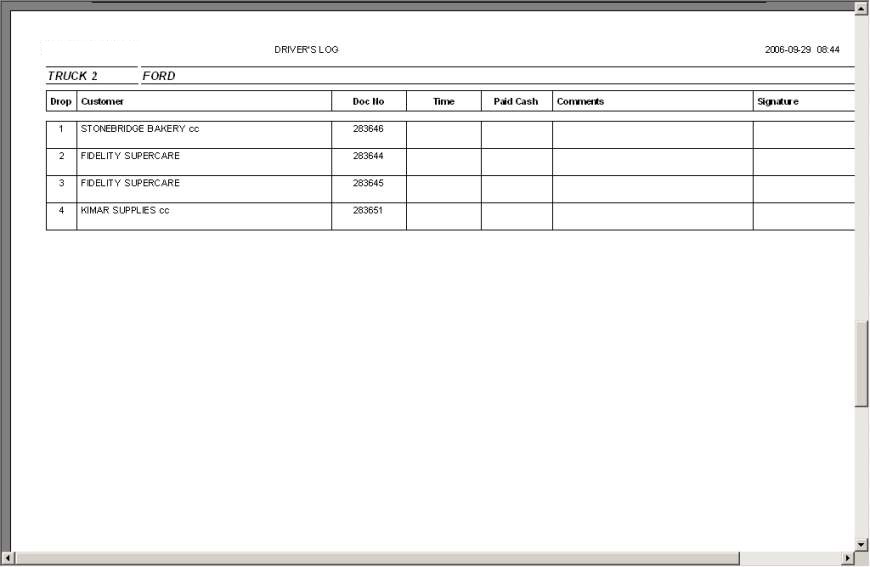
the top of the screen select the [Print] button Select the date on which the trips were scheduled for delivery. The trips stored for that day will be displayed, as shown below: Now select a vehicle for which you need documentation, and on the right hand side of the screen tick the boxes for the documents you will require. You will see, in the lower part of the screen that there are tags for the documents’ templates. As with any reports that have templates, you may set these up to suit your own style by holding the [Ctrl] button down whilst clicking the [View selected] button. Below are screen-shots of examples of the reports that you can print for the vehicle. The first report is the Trip sheet showing the different customers and the products that should be delivered to them. The second is a Loading sheet showing the totals of all of the products that are supposed to be on the vehicle for delivery. This is a useful check for security to use when checking the load. The third report is the Driver’s Log that can be signed by the customers when delivery is made and can act as a receipt for money received by the driver.
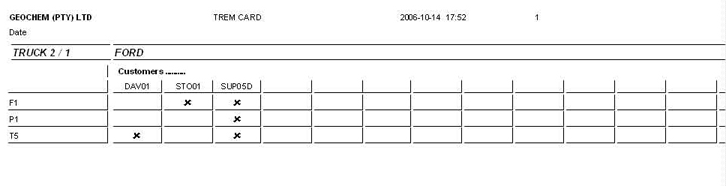
The Fourth report is the Tremcard Report (Available with ALCHEMIST only) that allows the driver to comply fully with the Transportation of Hazardous Materials act. All Tremcards that are shown on this report should be in the red folder at the start of the trip. As the driver makes his deliveries, he crosses off the column pertaining to the delivery. As
shown below,for example, when the driver has made the delivery to
customer Dav01, he crosses off that column, but although Tremcard
T5 was needed for this delivery, he still needs to keep it in the
red folder and may only remove it after he has made delivery to SUPO5D.
Neat, huh? |
||