| The
following description refers to the Customer module, but the Suppliers
module is set up in exactly the same manner.
Go to:[Customer][Invoices][Miscellaneous][Setup][Print Documents]
You will see a screen like this:
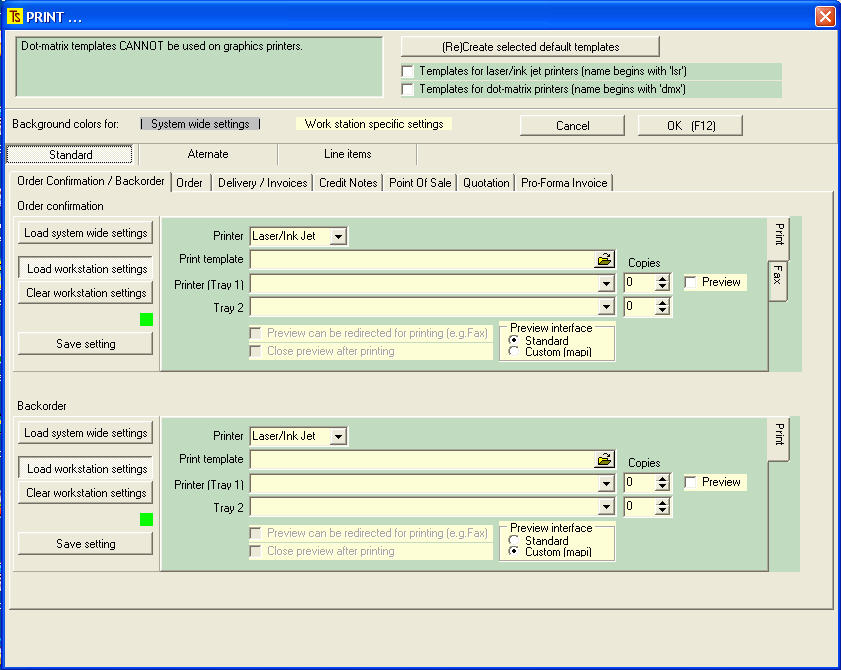
There
are a few important things to observe about this screen before you
start:
Firstly there is the default colour scheme:
There is:
A normal light grey background
A darker grey for settings that are system-wide (i.e. for each computer
on your network)
A pale yellow for settings that are specific to the terminal upon
which you are working
A grey-green highlighting different groups of functions
A bright green square to show that changes have been updated
A red square that will appear when changes have been made and not
updated.
The second thing
to notice is that there are three main tags: Standard, Alternate and
Line items
We will deal with Standard Items first.
The third thing to notice is the message that Dot-matrix templates
CANNOT be used on graphics (laser or ink-jet) printers.
Firstly please ensure that you have generated the correct basic default
templates.
Bear in mind that if you have previously made changes to templates
for invoices, etc. and have saved these templates with the same name
as the default templates, performing the next operation will overwrite
your changed templates. This is why, when you make changes to the
templates that we supply as defaults, it is advisable to save the
templates with a new filename.
If you are using dot-matrix printers for printing, tick the box at
the top right portion of the frame opposite "Templates for dot-matrix
printers (name begins with 'dmx')
If you are using laser printers or ink-jet printers, tick the box
at the top right portion of the frame opposite "Templates for
laser/ink jet printers (name begins with 'lsr')
If you use both dot-matrix and laser/ink jet printers, tick both boxes.
Now click the
[(Re)Create selected default templates] button
The templates will be created.
Now select
the first Tag under Standard [Order Confirmation / Backorder]
Within the above
screen you will see a screen similar to this:

If you are making
changes to the Print setup that are specific to the terminal upon
which you are working, then you should press the  button before making the changes and save the template with this button
depressed.
button before making the changes and save the template with this button
depressed.
If you are making changes that you would like to make available to
other workstations on your network click the  button and then save these settings with this button depressed. You
may go to another workstation and, by clicking on the
button on that machine, you will be able to immediately load the same
settings on that machine.
button and then save these settings with this button depressed. You
may go to another workstation and, by clicking on the
button on that machine, you will be able to immediately load the same
settings on that machine.
In the "Printer" field use the downward-pointing
arrow to select either Laser/Ink Jet or Dot-matrix,
depending what printer is being used by this computer.
NB - If you select Dot-matrix two new options (Formlength (lines))
and (Initialise) will appear next to the Printer field, thus:

You should enter the number of lines that your forms can handle (usually
48, 51 or 66). There are 6 lines per inch.
If you have an Epson printer or if your printer has been set to emulate
an Epson, then, when you save the settings, if you have entered no
initialisation values here, the following screen will appear and you
may accept the values inserted.
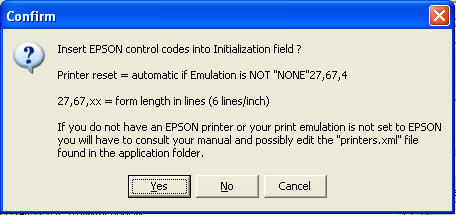
If you do not
have an Epson compatible printer, you will need to know, from your
printer manual, what the initialisation numbers for your
printer will be.
Now please tab to the next field "Print template"
and select the correct template by clicking on the "Open Folder'
icon at the right-hand end of the field and selecting a template file.
Tab out to the next field "Printer [Tray 1] and
select the correct printer from the drop-down box that appears when
the down arrow is clicked.
You will see that a facility exists, in the next field "Tray
2" to direct the same document to a second printer or
a second tray in the same printer. This function allows, for example,
the printing of a document to two different colour papers.
Under "Copies" you must select how many
copies of the document you wish to print, and if you select the "Preview"
box you will be shown a screen preview of each document before
it is printed.
If this box is ticked, the two Preview options boxes and the Preview
interface selection will become available for selection, as shown
below.

If you wish to fax these documents you should tick the first box "Preview
can be redirected for printing (e.g.Fax)"
If you want the preview to automatically close after printing
tick the relevant box.
We give you a choice of preview interface between Standard and Custom
(mapi)(Messaging Application Programming Interface)
The Standard interface looks like this:

This option allows you to print the document and to send via e-mail
if you are using a version of Outlook prior to 2003. If you are using
newer versions of Outlook this selection will not allow you to e-mail
properly out of the system.
One advantage of this selection is that it will allow the documents
to be exported to
The Custom (Mapi)
interface looks like this:

This option allows you to print, e-mail via a mapi interface, export
to a pdf or a MS Word document, and to fax directly out of the system.
In other words, this component which has been specially written by
Peter Reber actually works, whereas the other crap (Standard Option)
that comes with Fast Reports does not!
The options
should now be saved by clicking on the relevant [Save setting] button.
You will see the red block turn green.
If you now click
the
button and then save these settings again you may go to another workstation
and, by clicking on the
button on that machine, you will be able to immediately load the same
settings on that machine.
There is one other
tag that may need attention if you ever wish to fax documents directly
out of the system - the [Fax] tag that may be on
the right of the grey-green group, depending if there is an option
to fax the document.
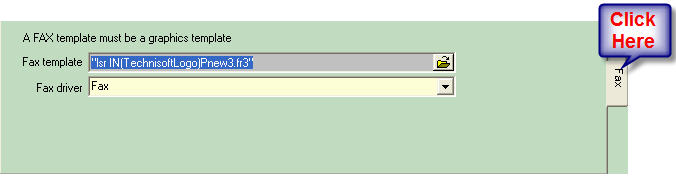
Please note that a fax template must always be a graphics
(laser or ink-jet) template.
Remember
to press F12 or [Save] when you have finished in order to save all
of your changes.
Repeat the above for each type of document that your company needs
to have printed by selecting the tabs for the different documents,
as shown below.

OTHER
OPTIONS
There are two other functions that may be invoked in special
cases.
They are the  and the
  options.
ALTERNATE
This option allows you to set up alternate, globally applicable
templates for Delivery Notes, Invoices and Credit Notes.
If these templates are set up, then you may go to a specific customer's
record (Under Customer [Maintenance] [Customer])
and on the [Balances] tag, you will see there is
an option to select these alternate templates for that specific
customer.
Note: There is even an option to set up templates
for these documents that is unique for a specific customer
by selecting the [Customer specific] radio button
and inserting the relevant templates! See below, red-bordered area.

LINE ITEMS
With special program versions, this option allows you to set up a
situation where different groups of products may have special templates
that may be redirected to printers in different areas of your factory
or offices. Each line of a picking slip, for example, would produce
a separate document.
There is also a facility to produce packing labels with full details
of the item packed.
These could be bar-coded.
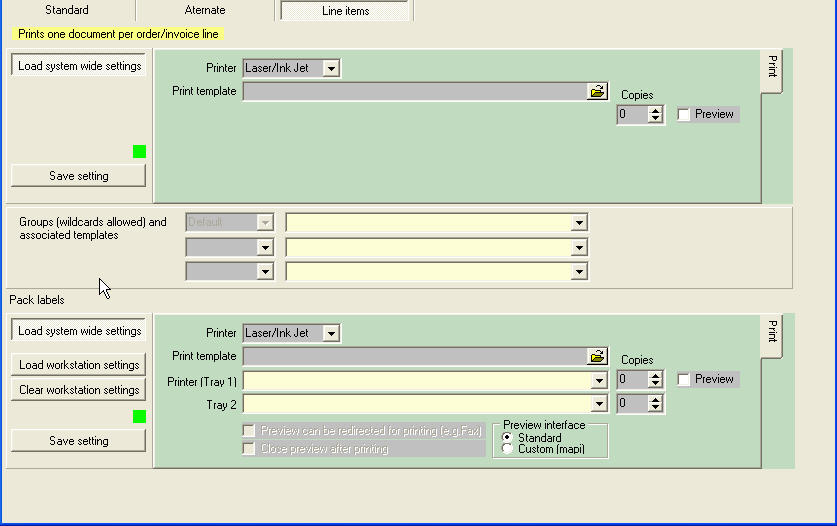
A full explanation of this function will be given on request.
For a printer-friendly pdf version of this
document go
HERE
|
